

Using Image Overlay Video to Enhance Corporate Training and Development


An image overlay video is an incredibly useful training tool where you place graphics, text, or other images directly on top of your video content. This simple technique transforms a standard, passive video into an active learning experience. It lets you highlight critical information, add your company branding, or provide important details at the exact moment your employees need them, making your training and development programs more effective.
Beyond Passive Viewing: The Power of Video Overlays for Employee Learning
Let's be honest—traditional corporate training videos often struggle to keep employees engaged. They might be watching, but are they really absorbing the material? This is where adding an image overlay with an interactive video platform like Mindstamp completely changes the game for your learning and development content.
By layering in simple visual aids, you turn passive screen time into a focused, educational session. It’s a small change that can dramatically improve how information is received and retained, boosting the ROI of your training initiatives.
Clarify and Reinforce Key Concepts
Imagine you’re training technicians on a new piece of machinery. Instead of just describing a specific component, you could use an image overlay to circle it, add a text label, or even display a close-up diagram right on the video. This immediate visual context eliminates confusion and ensures every employee understands exactly what you're talking about.
This approach is incredibly effective for critical training modules like:
- Safety Procedures: Displaying a bold "WARNING" text overlay when discussing a potential hazard.
- Software Tutorials: Highlighting specific buttons or menu options with arrows or boxes to guide users.
- Product Knowledge: Showing off key features with callouts that point to specific parts of a product.
The real magic of an image overlay in a training video is its ability to direct the learner's attention with precision. You're no longer just showing them something; you're actively guiding their focus to what matters most, which is a huge boost for comprehension and recall.
Boost Learner Engagement and Effectiveness
The idea of using overlays to clarify information isn't new—it's a cornerstone of effective digital communication. The impact is clear when you see that 87% of users have been convinced to make a purchase after watching a product demo video. Many of those demos use overlays to hammer home key features. You can find more details in these video marketing statistics on wistia.com.
The same exact principle applies to corporate training, where the "purchase" you're looking for is knowledge retention and skill acquisition.
Here's a quick look at how image overlays directly impact the effectiveness of corporate learning materials.
Key Advantages of Image Overlays in Training
By making training more visual and direct, you get better results without having to completely overhaul your content.
Ultimately, incorporating these elements makes your training more dynamic and measurable. You’re evolving your videos from a simple playback into a powerful teaching tool that drives real business outcomes.
How Image Overlays Work in Real-World Training
Theory is great, but let's talk about putting image overlays to work in your training programs. This is where they stop being just a cool feature and become a strategic tool that boosts clarity and keeps your team focused. The goal isn't just for them to watch the training, but to actually understand and apply it.
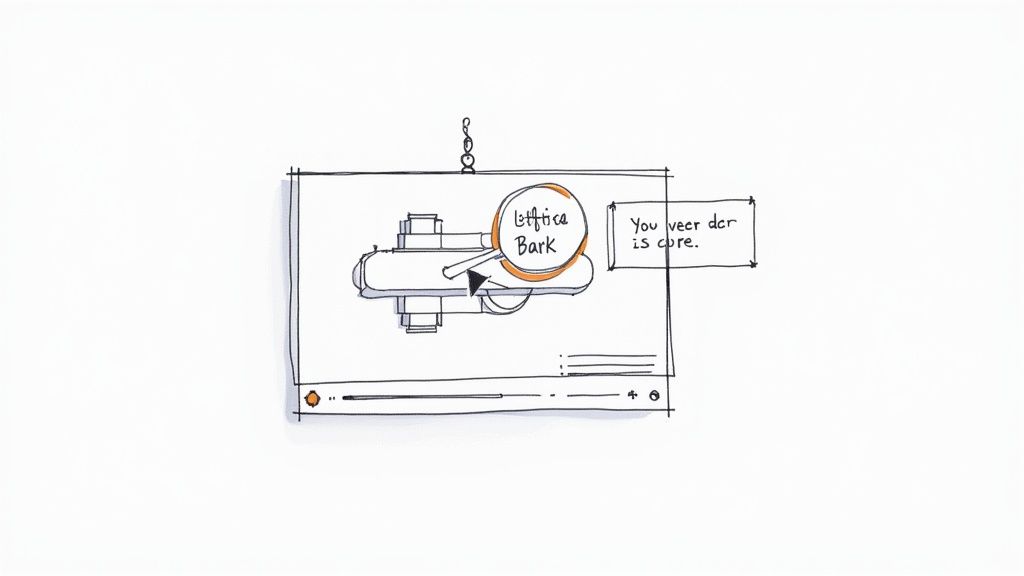
Think about a critical safety procedure video. The narrator is explaining the emergency shut-off valve, but instead of just talking about it, a bright red, pulsing circle appears right around the valve on screen. That simple overlay instantly grabs the learner's attention. There's zero confusion about what to look for, making the instruction far more powerful than words alone.
Leveling Up Your Software and Compliance Training
This same idea is a game-changer for software tutorials. Let's say you're training the sales team on a new CRM. You can use overlays to highlight the exact menu items, buttons, or form fields as they're being discussed. This visual hand-holding drastically cuts the learning curve and reduces those follow-up "where do I click?" questions. It's a huge time-saver for both learners and trainers.
Compliance training is another perfect fit. This material is often dense and absolutely critical to get right. Instead of just hoping your employees absorb every detail from a long video, you can pop an image overlay on screen with the key regulatory text at the exact moment it's mentioned. This reinforces the policy and makes the crucial information impossible to miss.
By strategically placing these visual cues, you're turning a standard video into an interactive guide. It ensures that every employee, no matter their learning style, can pinpoint the exact information they need, right when they need it.
These practical uses are becoming more important as video continues to dominate how organizations communicate. The global market for video marketing is exploding, with digital video ad spend in the U.S. alone projected to hit $130.97 billion by 2025. This just shows how effective video is at engaging and informing people—a principle that directly translates to better corporate training.
Every one of these scenarios shows how you can use Mindstamp's overlay features to make your training clearer, more memorable, and more impactful.
If you're looking for more comprehensive guidance on integrating advanced video techniques into your corporate strategies, there are some great resources out there on Mastering Corporate Event Video Production. Ultimately, the goal is to create training that actually sticks.
How to Create Effective Image Overlays in Mindstamp
Putting an image overlay in your Mindstamp video is a simple way to guide your learner's focus right where you want it. It all starts with picking the right visual. Maybe that's your company logo to keep your branding front and center, or perhaps it's a detailed diagram for a technical training module. The real goal is to add value, not just visual clutter.
First things first, you'll upload your image directly into the Mindstamp editor. Once it's in, you can just drag and drop it onto the video timeline. This is where you decide the "when" and "where" to place the overlay for the most impact. If you want a more detailed walkthrough of the upload process, we've got a helpful guide right here: how to add images in Mindstamp.
Timing and Positioning for Maximum Impact
Where you place your overlay is just as important as the image itself. For a corporate training video, you might want to tuck a company logo into a corner for the entire duration. It's a great way to reinforce brand identity without getting in the way. We call that a static overlay.
But what if you need to point something out specifically? For a software tutorial where you're highlighting a button, the overlay should probably only appear for a few seconds. Getting this timing just right is much easier thanks to the various editing tools available today that allow for this kind of precision.
This infographic breaks down a common workflow for using overlays in different training situations.
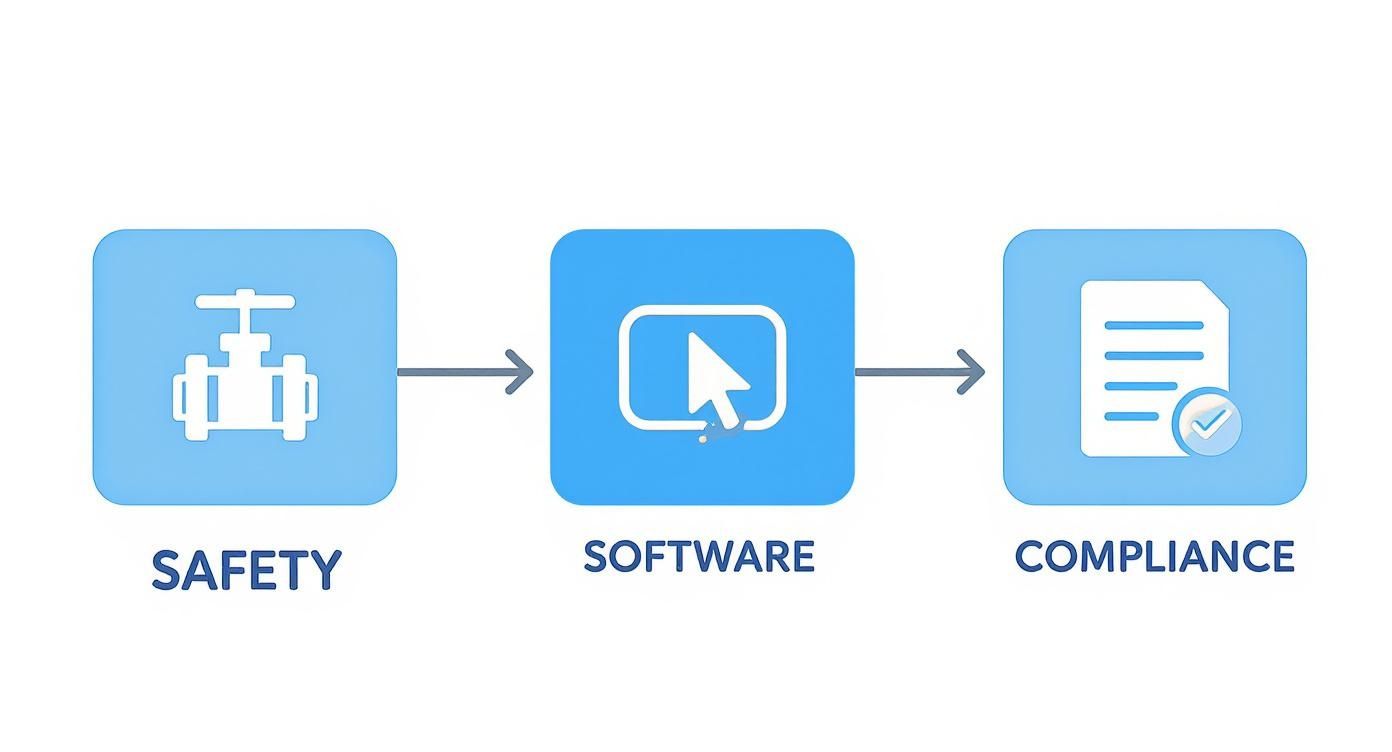
As you can see, the approach changes depending on whether you're creating safety, software, or compliance training. Each one needs a different touch when it comes to timing and content to maximize learning effectiveness.
Designing Helpful Overlays
A truly great overlay feels like it belongs in the video—it’s helpful, not distracting. Here are a few pro tips for creating effective training overlays:
- Use Transparent Backgrounds: This is a big one. For logos or icons, always use a PNG file with a transparent background. It helps the graphic blend in seamlessly instead of looking like a clunky box.
- Keep It Simple: Don't try to cram too much information onto the screen. A single, well-placed overlay almost always beats multiple graphics competing for attention.
- Animate for Attention: A subtle animation, like a simple fade-in, is a fantastic way to draw the learner’s eye to a new overlay without being jarring.
The key takeaway here is that every overlay needs a clear purpose. Before you add one, just ask yourself: "Does this graphic clarify the message or reinforce a key learning objective?" If you can answer yes, you're on the right track.
By following these simple guidelines, you can create a professional-looking image overlay video that genuinely enhances the corporate learning experience.
Making Your Overlays Interactive and Clickable
A static image overlay is a great start, but the real power for training and development comes when you make them clickable. This is where you can turn a passive viewing experience into an active learning tool that genuinely engages your team and deepens comprehension.
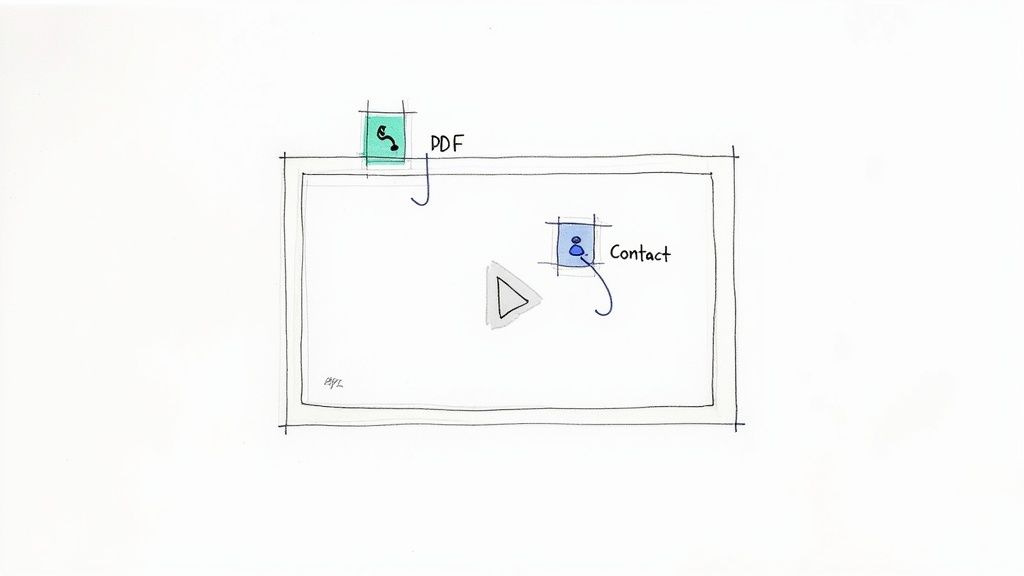
Think about a new product training video. Instead of just seeing a text callout on screen, what if an employee could click an overlay right on the product to instantly download a full PDF spec sheet? That’s the power of interactivity—it lets them dive deeper the exact moment their curiosity is sparked.
Creating Personalized Learning Journeys
When you add interactivity, you're handing control over to the learner. You're no longer delivering a one-way lecture; you're creating a two-way conversation that lets employees explore content at their own pace and carve out their own learning paths.
This unlocks some seriously practical benefits for corporate training:
- Just-in-Time Resources: Imagine an onboarding video. An overlay on a team member's introduction could link directly to their contact details in your company directory.
- Deeper Dives: Got a complex diagram in a technical training? Connect it to a supplementary video that breaks down the concept in greater detail for those who need it.
- Direct Access to Tools: If you're discussing a specific piece of software, place a clickable icon that opens that exact tool or internal resource right then and there.
This level of interaction turns your video into a central hub for learning. You’re providing resources exactly when they are most relevant, which significantly deepens understanding and encourages active participation from your team.
This is the core of what makes an image overlay video so powerful in a corporate setting. The ability to link out to other resources or trigger actions within the video itself is what separates basic training from a truly engaging and measurable learning experience.
For a detailed walkthrough on getting this set up, you can learn how to use clickable images on your videos with Mindstamp.
Using Analytics to Measure Training Impact
Putting an interactive image overlay into your video is a great first step, but it’s only half the story. The real value for corporate training happens when you dig into how employees are actually engaging with the content. That's where Mindstamp's analytics come in, giving you the exact data you need to measure training effectiveness.
This is way more than just counting views. We're talking about seeing which specific team members clicked on that critical safety warning you added, or who downloaded the supplementary PDF. This granular data gives you powerful, direct insight into where your team is confident and where there might be knowledge gaps. It takes all the guesswork out of evaluating your training programs.
Connecting Clicks to Comprehension
Let’s say you added a clickable overlay to explain a complex new procedure. If you check the analytics and see that 90% of viewers are clicking it, that’s a clear indicator that the concept needs a better explanation in the main video itself. Suddenly, your interaction data is directly connecting your training content to employee comprehension levels.
This isn't just about tracking clicks for the sake of it; it's about proving the ROI of your training efforts. By analyzing interaction data, you can pinpoint which parts of your training are hitting the mark and which need a tune-up, ensuring every dollar spent on L&D is effective.
This creates a powerful feedback loop for continuous improvement. You can tweak and refine your materials based on how people are really using them, making every new version of your training more impactful than the last. This data-driven approach turns training from a simple box-ticking exercise into a strategic tool for boosting performance.
You can dig into the different ways to view interactive video data analytics and reports in Mindstamp to get the complete picture of your training's effectiveness. When you start using these tools, you can finally measure the true impact of your learning and development programs.
A Few Common Questions About Image Overlays
As you start adding image overlays to your training videos in Mindstamp, a few questions tend to pop up. Let’s walk through some of the most common ones we hear from L&D professionals.
What’s the Best Image File Type to Use?
For the cleanest, most professional look, you'll want to use PNG files with transparent backgrounds. Hands down.
This format is perfect for things like your company logo or custom graphics. It lets the image sit right on top of your video without that clunky, distracting box around it. While you can use JPEGs, they don’t support transparency, so you’ll almost always get a more polished result with a PNG.
Can I Make Just a Section of the Video Clickable?
Absolutely. This is one of the most powerful ways to use overlays for interactive learning.
You can create what’s called a "hotspot" by uploading a completely transparent PNG image. It's basically an invisible button. Just place this invisible overlay over any object or area in your video you want to make interactive. Then, inside Mindstamp, you can assign an action to it—like jumping to another part of the video, opening a link to a helpful resource, or even popping up a critical message for your learner.
How Do I Make Sure My Overlays Look Good on Mobile?
The key here is to keep things simple.
Use clear, high-contrast graphics that are easy to see and tap on a smaller screen. A pro tip is to avoid placing your interactive overlays in the far corners of the video. Mobile player controls can sometimes cover them up, which can be frustrating for learners.
While the Mindstamp player is fully responsive, it’s always a good idea to preview your video on an actual phone. It’s the only way to be 100% sure everything is visible and easy to interact with.
Ready to see how interactive video can transform your corporate training? With Mindstamp, you can easily add clickable image overlays, get detailed insights on learner engagement, and finally measure the true impact of your training content. Start creating more effective training videos today.
Get Started Now
Mindstamp is easy to use, incredibly capable, and supported by an amazing team. Join us!


Try Mindstamp Free


