

How to Reduce Video File Size for Corporate Training


You've probably heard you can shrink a video's file size by messing with its resolution, bitrate, or codec. But before we get into the how, let's talk about why this is so critical for corporate training and development. When you're dealing with oversized videos, you’re setting your team up for buffering delays that completely derail learning, mess with your analytics, and drive up operational costs. A simple training module quickly becomes a frustrating roadblock.
Why Large Video Files Derail Corporate Training
Slow, buffering videos aren't just a minor hiccup in a corporate training environment; they're a direct threat to the effectiveness of your entire program. When an employee sits down for a required compliance module or a new software tutorial, their time and attention are precious. Every second they spend staring at a loading spinner is a moment their engagement evaporates.
This isn't just a feeling, either. It has real consequences. Studies consistently show that viewer drop-off rates spike with buffering delays. For a learning and development (L&D) pro, this is a nightmare—it means your carefully crafted content might never even be seen, and key learning objectives are completely missed.
The Suitcase Analogy: A Better Way to Think About Video Files
Let's try a simple analogy. Think of a video file as a suitcase you're packing for a trip. The stuff you pack determines its final weight and size.
- Resolution (The Size of Your Clothes): A 4K video is like packing heavy winter coats. A 1080p video is like packing t-shirts. Both get the job done, but one is way lighter and easier to manage. For most training scenarios on a standard laptop screen, 1080p is more than enough.
- Bitrate (How Tightly You Pack): This is all about the amount of detail you cram into every second of video. A high bitrate is like just tossing items into your suitcase—it takes up a ton of space. A lower, optimized bitrate is like neatly rolling your clothes to fit more in without wrinkling them.
- Codec (A Vacuum Sealer Bag): The codec is the compression technology itself. An older codec is like a regular old suitcase. A modern one, like H.265, is a vacuum sealer bag that shrinks everything down without actually losing the original item.
This little analogy helps reframe video compression. It's not just a technical chore; it’s a strategic decision about "packing" your training content efficiently for its journey to the learner.
Key Takeaway: The goal isn't just to make a video smaller; it's to make it smarter. A well-compressed video delivers the necessary quality without the baggage of slow load times, ensuring the learning experience remains seamless and effective.
The Hidden Costs of Bloated Video Files
Beyond learner frustration, bulky files create some serious operational headaches.
On an interactive video platform like Mindstamp, we measure engagement by tracking clicks, responses, and view duration. But if a video buffers endlessly or fails to load, those analytics get skewed. You might mistakenly conclude a topic is boring when the real villain is a technical barrier. Digging into different hosting methods can shed more light on this; you can see a great comparison by learning more about uploading a video vs. using a video embed.
Then there are the direct financial costs. Storing and streaming terabytes of unoptimized video data leads to bloated hosting and bandwidth bills. By learning how to reduce a video's file size, you’re not just improving the learner experience—you're making a financially sound decision that lets you put your L&D resources where they really matter.
The Keys to Smart Video Compression
If you want to get a handle on your video file sizes, you need to understand the three critical levers you can pull: resolution, bitrate, and codecs. Getting these right can dramatically shrink your files without sacrificing the clarity your learners need.
Mastering these concepts transforms video compression from a frustrating technical hurdle into a real strategic advantage, especially for corporate training where engagement is everything.
This decision tree nails down exactly how file size impacts your outcomes.
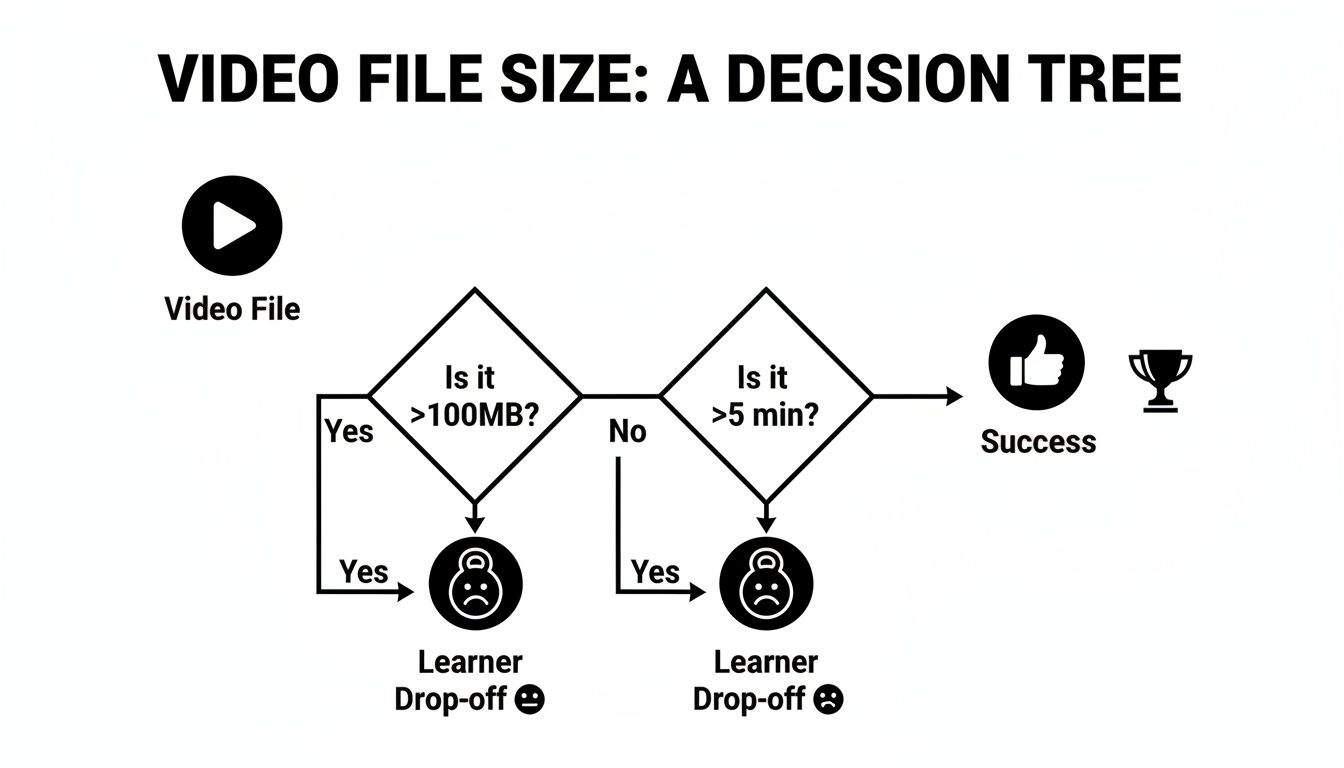
As you can see, large, clunky files are a direct path to learner drop-off. On the flip side, smartly compressed videos lead to successful, engaging training experiences.
Find the Right Resolution for Your Audience
Resolution is simply the number of pixels that make up your video's image, usually shown as width by height (like 1920x1080 pixels, which we all know as 1080p). While a 4K video might sound impressive on a spec sheet, it's often total overkill for training modules viewed on a standard laptop or monitor.
For most corporate training content, 1080p is the sweet spot. It offers excellent clarity without the enormous file size that comes with 4K.
In many cases, like simple screen recordings or talking-head videos, 720p is perfectly fine and results in an even smaller, faster-loading file. The key is to match the resolution to the viewing context, not just chase the highest number.
Manage Your Data Budget with Bitrate
Think of bitrate as the "data budget" for each second of your video. It’s measured in kilobits or megabits per second (kbps or Mbps) and directly controls both the video's detail and its final file size. A higher bitrate means more data and better quality, but also a much larger file.
You'll generally run into two types of bitrate encoding:
- Constant Bitrate (CBR): This method assigns the same data budget to every single second of the video, whether it’s a static title card or a complex action scene. It's predictable but pretty inefficient.
- Variable Bitrate (VBR): This is the smarter approach. It allocates more data to complex, high-motion scenes and dials it back for simpler, static moments. VBR is almost always the better choice, as it produces a smaller file for the same perceived quality.
Just switching from CBR to VBR can often shave an extra 10–25% off your file size without any visible drop in quality. That efficiency is huge for getting training videos to load quickly.
For 1080p training content, a great rule of thumb is to target a variable bitrate between 5,000 and 8,000 kbps. This range provides a crisp image that’s ideal for platforms like Mindstamp, where interactive elements demand clarity.
Choose Modern Codecs for Maximum Efficiency
A codec (short for coder-decoder) is the technology that actually compresses and decompresses your video data. The codec you choose is one of the most powerful factors in determining your final file size. For years, H.264 (also called AVC) was the king of the hill.
But modern codecs offer far better compression.
Switching from H.264 to a more efficient codec like H.265 (HEVC) can slash your file size by 30–50% while maintaining the exact same visual quality. For example, a 1080p video that looks great with H.264 at 12 Mbps can often achieve the same perceptual quality with H.265 at just 6–8 Mbps.
That difference directly translates to faster loading times for your learners—a critical win for any web-based training.
These compression techniques aren't just for training; they're fundamental across industries. Mastering them is essential for everything from corporate e-learning to creating captivating video tours that leave a lasting impression.
It also helps to understand the delivery technology behind the scenes. Check out our guide on how HTTP Live Streaming (HLS) works to get a deeper appreciation for the mechanics that make modern video streaming possible.
By choosing the right combination of resolution, bitrate, and codec, you can ensure your videos are both high-quality and highly accessible to everyone on your team.
Time to Pick Your Video Compression Tool
Knowing why a training video file is massive is half the battle. Now for the fun part: picking the right tool to shrink it down without making it look like it was filmed on a potato. You don't need a pro-level editing suite to get fantastic results. We're going to walk through the best options, from powerful desktop apps to the surprisingly capable tools already on your computer.

We'll focus on real-world workflows you'd actually use for corporate training, so you can get your content ready for an interactive video platform like Mindstamp quickly and painlessly.
HandBrake: The Free and Powerful All-Rounder
There's a reason HandBrake has been a go-to for years. It's free, open-source, and strikes the perfect balance between simple presets and deep, granular controls for anyone who likes to tinker.
Let's say you just recorded a 45-minute compliance training video in beautiful 4K. The problem? The file is a monstrous 15 GB—way too big for smooth streaming. HandBrake is perfect for this.
Here’s a practical workflow to tame that file:
- Open Your Video: Fire up HandBrake and drag your source file in.
- Pick a Preset: For web-based training, head to the "Web" category and choose the "Fast 1080p30" preset. This one click adjusts dozens of settings and gets you 90% of the way there.
- Check the Codec: Jump over to the "Video" tab. Make sure the Video Encoder is set to H.265 10-bit. It’s a newer codec that offers way better compression than the old H.264 standard.
- Tweak the Quality: Instead of a fixed bitrate, HandBrake uses a Constant Quality slider (RF, for Rate Factor). For H.265, a value between 22-28 is the sweet spot. Lower numbers mean higher quality and bigger files, so start at 24 and run a short preview to see how it looks.
- Start Encoding: Choose where to save your new file and hit "Start Encode." That 15 GB behemoth can often be squeezed down to under 1 GB with these settings, and your learners won't notice a difference in quality.
FFmpeg: The Command-Line Powerhouse
If you're comfortable in a terminal window, FFmpeg is the undisputed king. It’s the powerful engine running behind the scenes of countless video apps. While it might look a bit intimidating, a few simple commands can handle just about any compression task with incredible speed.
Imagine you have a 2-minute software tutorial for your team. It needs to be tiny and load instantly.
Pop open your terminal or command prompt, navigate to your video's folder, and run a command like this:
ffmpeg -i software_tutorial.mov -vcodec libx265 -crf 26 -preset fast -c:a aac -b:a 128k software_tutorial_optimized.mp4
Here's a quick breakdown of what that does:
-i software_tutorial.mov: This is your input file.-vcodec libx265: Selects the super-efficient H.265 video codec.-crf 26: Sets the Constant Rate Factor to 26—a great balance of quality and file size.-preset fast: Tells FFmpeg to prioritize encoding speed.-c:a aac -b:a 128k: Encodes the audio to the AAC format at a 128 kbps bitrate.software_tutorial_optimized.mp4: This is the name of your new, smaller output file.
Pro Tip: Don't let the command line scare you. Once you find a command that works for your training content, save it in a text file. Copying and pasting is often way faster than clicking through a bunch of menus in a GUI, especially for repetitive tasks.
Quick Fixes With Built-in OS Tools
Sometimes you just need to trim a few seconds off a recording or do a quick resize without installing anything new. Both Windows and macOS have solid built-in tools that get the job done for L&D teams.
For Windows Users: Clipchamp
Windows 11 comes with Clipchamp, a surprisingly capable video editor. Say you have a screen recording that runs a bit long. Just pull it into Clipchamp, trim off the fluff at the beginning and end, and export it at a lower resolution.
When you click "Export," just choosing 720p instead of the original 1080p or 4K can easily slice the file size in half, even before accounting for the trim.
For macOS Users: QuickTime Player
QuickTime Player is more than just a viewer. It has a handy "Export As" feature that’s perfect for fast-and-easy compression. Just open your training video, go to File > Export As, and pick 1080p or 720p. QuickTime automatically uses efficient H.265 compression, making it a one-click fix for shrinking a video before you upload it.
Cloud-Based Services for Team Collaboration
When you’re part of an L&D team, managing video encoding can become a real bottleneck. This is where cloud-based video processing services shine. You upload your big master files, and their powerful servers do all the heavy lifting in the background.
This approach is a lifesaver for teams that process videos in batches. You can upload an entire course worth of video modules, apply a single compression profile to all of them, and get a notification when they’re ready. It frees up your own computer and ensures every video across your training content is consistent—a smart way to scale your workflow.
Optimizing Video for Interactive Platforms Like Mindstamp
Interactive video brings a whole new set of challenges to corporate training. When you're asking learners to click on-screen hotspots, answer timed questions, or navigate branching paths in a platform like Mindstamp, video clarity stops being a "nice-to-have" and becomes absolutely essential.
Squeezing your video file down as small as possible might feel like a quick win, but it can backfire badly. Aggressive compression can easily blur the small text or visual cues that your interactive elements rely on. Even worse, it can create tiny timing shifts, causing hotspots to pop up a split-second too late and throwing the entire experience out of sync.
Protecting the Learner Experience
The goal here is a balancing act: the video needs to be small enough to load fast on any connection, but crisp enough for every interactive element to be perfectly clear and functional. Nobody wants to squint at a blurry product demo or a pixelated software tutorial—it just leads to frustration and kills engagement.
Think of the video file you upload to Mindstamp as your "master copy." It needs to be high quality because the platform will use it as the source to create all the different streaming versions for your audience.
Giving the platform a clean, well-compressed master file is the single most important thing you can do. A strong source file allows Mindstamp to create high-quality, lower-bitrate versions for viewers on slower connections without introducing those ugly, blocky compression artifacts.
The Magic of Adaptive Bitrate Streaming
Platforms like Mindstamp don't just send your single uploaded file to every learner. Instead, they use a clever process called adaptive bitrate streaming. When you upload your master file, the platform automatically encodes several copies at different resolutions and bitrates—say, a 1080p, a 720p, and a 480p version.
The moment a learner hits play, Mindstamp instantly detects their internet speed and device. It then serves up the best possible version they can watch without buffering. Someone on a blazing-fast office network gets the pristine 1080p stream, while a field employee on a shaky mobile connection gets the smaller, smoother 480p version. Everyone gets a good experience.
Crafting the Ideal Master File for Training
Your job is to feed this process a high-quality, efficiently compressed source file so it can work its magic. Practical, measurable tweaks to resolution and frame rate can slash file sizes with very little impact on quality. For example, dropping from 4K to 1080p routinely cuts file size by a massive 60–75% with almost no perceptible loss for most training content.
The data backs this up—most businesses stick to Full HD, proving you can skip the 4K overhead without sacrificing comprehension. This kind of optimization is just as vital for e-commerce, where it can directly impact sales; you can see this principle in action when leveraging product videos on Amazon.
Ready to build the perfect master file for your interactive training? Here are our top recommendations for any interactive video platform:
- Resolution: Stick to 1080p (1920x1080). It's the sweet spot, offering fantastic clarity for on-screen text and details without creating a massive file.
- Frame Rate: Use 30 FPS. A higher frame rate like 60 FPS is overkill for most training content and will nearly double your file size for no real benefit.
- Codec: If you can, export using a modern codec like H.265 (HEVC). It offers much better compression than the older H.264 standard, meaning you get the same quality in a smaller package.
- Bitrate: Aim for a variable bitrate (VBR) somewhere between 5,000 and 8,000 kbps. This range keeps visuals sharp enough for interactive elements to pop without bloating the file.
Following these simple guidelines ensures your interactive training is not just effective, but accessible and seamless for every single learner, no matter where or how they’re watching.
Automating Your Video Compression Workflow
If you're part of a learning and development team creating training content at scale, you already know the pain. Manually compressing every single video is a massive bottleneck. It’s slow, it's easy to make mistakes, and it pulls your instructional designers away from what they do best: creating great content. The good news is, you can automate the entire process, turning video compression from a manual chore into a smooth, hands-off workflow.
This isn't just about saving a few minutes here and there. It’s about being able to scale your whole L&D program. When you automate how you reduce a video file size, you can get training materials out the door faster, keep your branding consistent with standardized settings, and free up hundreds of hours for your team.
Get Started with Scripts for Batch Processing
One of the most straightforward ways to jump into automation is by using scripts with a command-line tool like FFmpeg. Instead of sitting there processing one file at a time, you can write a simple script that churns through an entire folder of videos while you’re doing something else—or even overnight. This is called "batch processing," and it’s a total game-changer for large training libraries.
Let's say you just wrapped up production on twenty new onboarding videos. With a script, you can tell your computer to:
- Look inside a specific folder.
- Apply your company's standard compression settings (maybe 1080p, H.265 codec, and a 6,000 kbps bitrate) to every single video it finds.
- Drop all the newly compressed files into a "Ready for Upload" folder.
This whole operation can run after hours. By the next morning, all your training content is perfectly optimized and ready to be uploaded to your interactive video platform.
Integrate with a Media Asset Management System
As your video library explodes, a Media Asset Management (MAM) system becomes your best friend. These platforms are a central command center for all your media, and many of them come with powerful, built-in automation tools.
A common feature in a MAM is something called a "watch folder." You can set up a rule where any video file dropped into this specific folder automatically kicks off a compression workflow. This means an instructional designer can export a high-res master file, save it to the watch folder, and just walk away. The MAM takes over from there, creating the optimized web version without anyone needing to click another button.
Automation ensures that every single training video, from a quick software update to a comprehensive compliance course, adheres to the exact same quality and file size standards. This brand consistency is crucial for creating a professional and reliable learning experience.
This shift to automation isn't just happening on individual teams; it’s a huge market trend. The global video compressor market was valued at USD 2.5 billion in 2023 and is expected to climb to USD 5.8 billion by 2032. That growth is being pushed by investments in cloud encoders and AI-powered tools that make it easier for organizations to reduce video file sizes at scale. You can explore detailed insights on video compression technology trends to see where the industry is headed.
Use APIs for a Truly Seamless Pipeline
For the most powerful and scalable setup, you'll want to look at cloud encoding services that offer APIs (Application Programming Interfaces). An API is basically a way for different software programs to talk to each other directly, opening up a world of possibilities.
For instance, you could connect your video editing software straight to a cloud encoding service. When an editor hits "export" on a final cut, the system could automatically push that file to the service for compression. Once it's done, the optimized file could be sent directly to your Mindstamp account, ready for you to add interactivity.
This kind of integration creates a completely seamless pipeline from creation to deployment. You can even build in some clever logic. Imagine building a workflow where video completion data from Mindstamp triggers actions in your other business tools. To get some ideas, check out our post on driving amazing business workflows with interactive video and Zapier.
Ultimately, by automating your compression workflow, you free up your team to focus on what actually matters: creating learning experiences that are engaging and effective.
A Few Common Video Compression Questions
Even when you have the process down, a few questions always seem to pop up. Here are some quick answers to the things we get asked most often by corporate training pros. Think of this as your go-to reference to keep things moving.
Will Making a Video Smaller Always Make It Look Worse?
Not if you do it right. Modern video compression is all about working smarter, not just harder. By using efficient codecs like H.265 and choosing the right bitrate, you can slash a video's file size without any quality loss you can actually see.
The whole point is to ditch the redundant data your viewers will never notice anyway. For most corporate training videos, the difference between a gigantic master file and a well-optimized version is completely invisible to the learner—but it makes a massive difference in how fast the video loads and how accessible it is.
What's the Best Video Format for Corporate Training?
Hands down, it's MP4. It’s the undisputed champ for corporate L&D for a reason—it’s the universal standard.
MP4 strikes that perfect balance between high quality and a file size that doesn’t take forever to download. Most importantly, it just works. It’s compatible with pretty much every device, browser, and learning platform you can think of, including interactive video platforms like Mindstamp. The industry standard is to wrap either an H.264 or the newer, more efficient H.265 codec inside that MP4 file.
Can I Compress a Video That's Already Been Compressed?
You can, but you really shouldn't. Trying to re-compress an already compressed video almost always leads to a noticeable drop in quality. Every time you run the compression process, you're throwing out more data. Do it again, and you'll start to see nasty digital artifacts like blockiness or blurry motion.
Think of it like making a photocopy of a photocopy. Each time you do it, the image gets a little fuzzier and harder to read. Always, always go back to your original, highest-quality source file whenever you need to create a new, compressed version. That way, you’re starting with the most visual information possible.
How Do I Figure Out the Right Bitrate for My Training Video?
Choosing the perfect bitrate feels a bit like a guessing game, but there's a practical way to nail it. Start with the recommended settings we talked about earlier in the guide. For a typical 1080p video running at 30 frames per second, a variable bitrate somewhere between 5,000 and 8,000 kbps is a fantastic starting point for training content.
Here’s the pro tip: test a small piece first. Don't waste time encoding your entire hour-long module only to find out it looks fuzzy. Export just a one-minute clip with your chosen settings. Then, watch it on the same kinds of devices your learners will be using. If the video is sharp and all the text is crystal clear, you’ve found your sweet spot. Go ahead and apply those settings to the full-length video with confidence.
Ready to transform your training content from something people just watch into an active learning experience? With Mindstamp, you can easily add questions, hotspots, branching logic, and more to any video. Stop wondering if your team is engaged and start measuring it. Create your first interactive video for free today.
Get Started Now
Mindstamp is easy to use, incredibly capable, and supported by an amazing team. Join us!


Try Mindstamp Free


