 Brett Lindenberg
Canva can design every screen of a video quiz, but the video it exports cannot take a click. Canva's help center says links in a design work in PDF downloads and while you present, and they do not work in MP4 files. To build an interactive video quiz, design each question and its answer buttons in Canva, download the video as an MP4, and upload it to an interactive video tool such as Mindstamp. In Mindstamp you place a clickable hotspot over each button you designed, send the viewer to the next question, and add up a score that picks the product at the end. We built the skin care quiz below this way from one 66-second Canva video, so play it before you start.
Can you make an interactive quiz in Canva?
You can make a clickable quiz with Canva, but it works only inside Canva, in a PDF, or on a Canva website. Canva has two ways to do it:
- In a presentation, add a link to an answer and point it at another page in the same design, such as a "Correct" page and a "Try again" page. Canva's help article on adding hyperlinks says links stay clickable when you present the design or download it as a PDF, and that they do not work in MP4, PNG, or JPG files.
- With Canva Code, you describe a quiz to Canva AI and it writes an interactive design for you. Canva says the interactivity works when the design is viewed on Canva or published as a website. Canva Code counts toward your Canva AI usage, and a team admin or teacher can choose who has access to it.
| Route | Where viewers answer | Fits |
|---|---|---|
| Linked pages in a Canva presentation | While you present the design, or in a PDF | A live quiz you run in a class or a meeting |
| Canva Code | In Canva, or on a published Canva website | A quiz page with no video |
| Canva video plus Mindstamp | In the video player, through a share link or an embed on your website | A video that waits for each answer, records it for each viewer, and ends on a product |
This guide builds the third route: a product recommendation quiz for shoppers. For a scored knowledge quiz on a lesson or training video, use our guide to creating an interactive video quiz instead. To let AI draft questions from what a video says, read how to turn any video into a quiz with AI.
Plan the quiz before you open Canva
Start from the results. List the products or routines you might recommend, then write the questions that separate them. A shopper should be able to answer each question about themselves in a second or two, such as how their skin feels after washing. Our skin care quiz asks three questions and ends on one of two results: hydration or moisture.
Then choose how answers lead to a result. Mindstamp supports three patterns:
| Pattern | How it works | Plan |
|---|---|---|
| One deciding question | Each answer jumps straight to its own result scene | Every plan |
| Branching path | Each answer jumps to a different next scene, and every path ends on a result | Every plan |
| Score | Some answers add points to a variable, and conditional logic sends the viewer to the result that matches the total | Variables on Core and higher, conditional logic on Pro and higher |
A branching path is simple with one or two questions and grows fast after that, because each answer splits the path. With three yes-or-no questions, a full tree needs seven question scenes. The score pattern keeps one scene per question however viewers answer, which is why our demo uses it.
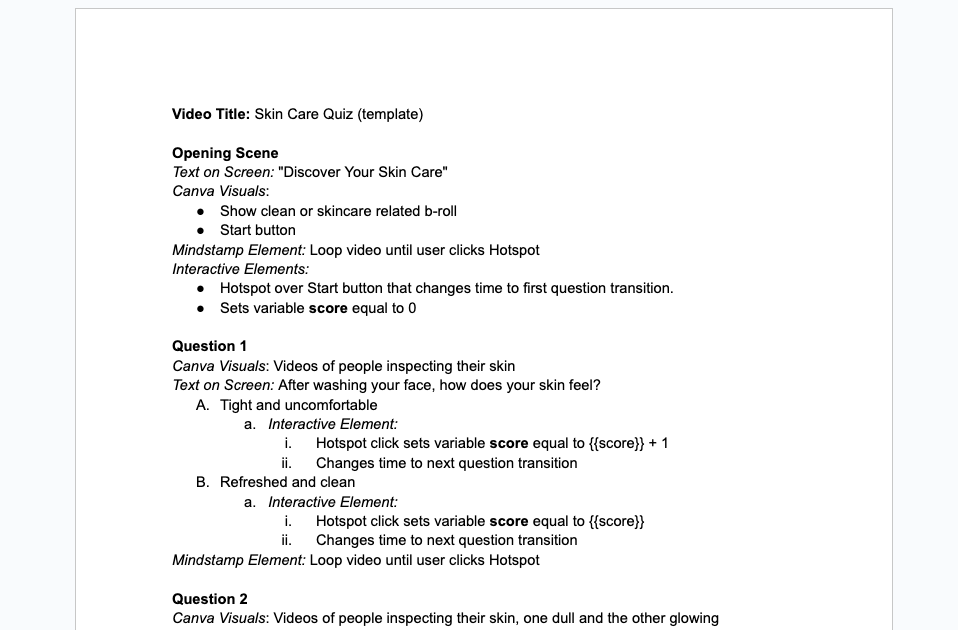
Write the plan down as a scene list before you design. Ours named each scene, its on-screen text, the Canva visuals, and the Mindstamp interaction that would sit on top.
How to make the quiz video in Canva
Canva's video editor has a timeline at the bottom of the screen: a main track for clips and backgrounds, upper tracks for text and graphics that sit on top, and separate audio tracks (Canva Help Center, create and edit videos). Start a video from the Canva homepage, or select Create and then Videos, and build one scene for each screen of the quiz.
- Make an opening scene with a title and a Start button, one scene for each question, and one scene for each result.
- Design the answer buttons in Canva so they match your brand. Make them large enough to tap on a phone, and keep them away from the bottom edge, where the player controls appear. In our first question, each answer has a label and a short video of a person, and both are clickable.
- Give every scene a hold. After the text and buttons finish their entrance animations, keep the scene on screen for a few seconds with no exit animations. Ours run about six seconds. Mindstamp will repeat this hold until the viewer clicks, and gentle motion, such as a slow video clip, hides the repeat better than a still frame.
- Add short transitions between scenes. Select a clip on the main track, select the More icon, and select Add transition.
- Add music with the Add Audio button in the timeline. Each loop jumps the music back as well, so pick an even, ambient track. Keep voice-over out of the holds, or viewers hear the same line again each time the scene repeats.
- Write down three times for every scene: when it starts, when its buttons are fully on screen, and when its hold ends. You will type these into Mindstamp.
To see how we laid out each scene, open the Canva design behind the skin care quiz. If your quiz already exists as slides in PowerPoint, Keynote, or Google Slides, our guide to turning a slide presentation into an interactive video covers the export from each app.
Download the video from Canva
- Above the editor, select Share, then Download.
- Choose MP4 Video as the file type.
- Select Download. If the design uses paid elements, Canva asks you to pay before the download starts.
If a long video will not download, Canva's troubleshooting article suggests reducing the resolution to 1080p (Canva Help Center). Play the file once from start to end and check each scene against the times you wrote down. The links you added in Canva are not in this file, and Mindstamp adds the clickable layer in the next step.
Add the interactions in Mindstamp
In Mindstamp, select New video, choose Upload, and drop in the MP4. The editor opens while the upload continues. Mindstamp adds its interactions on top of the video and does not change the file (see which videos you can use).
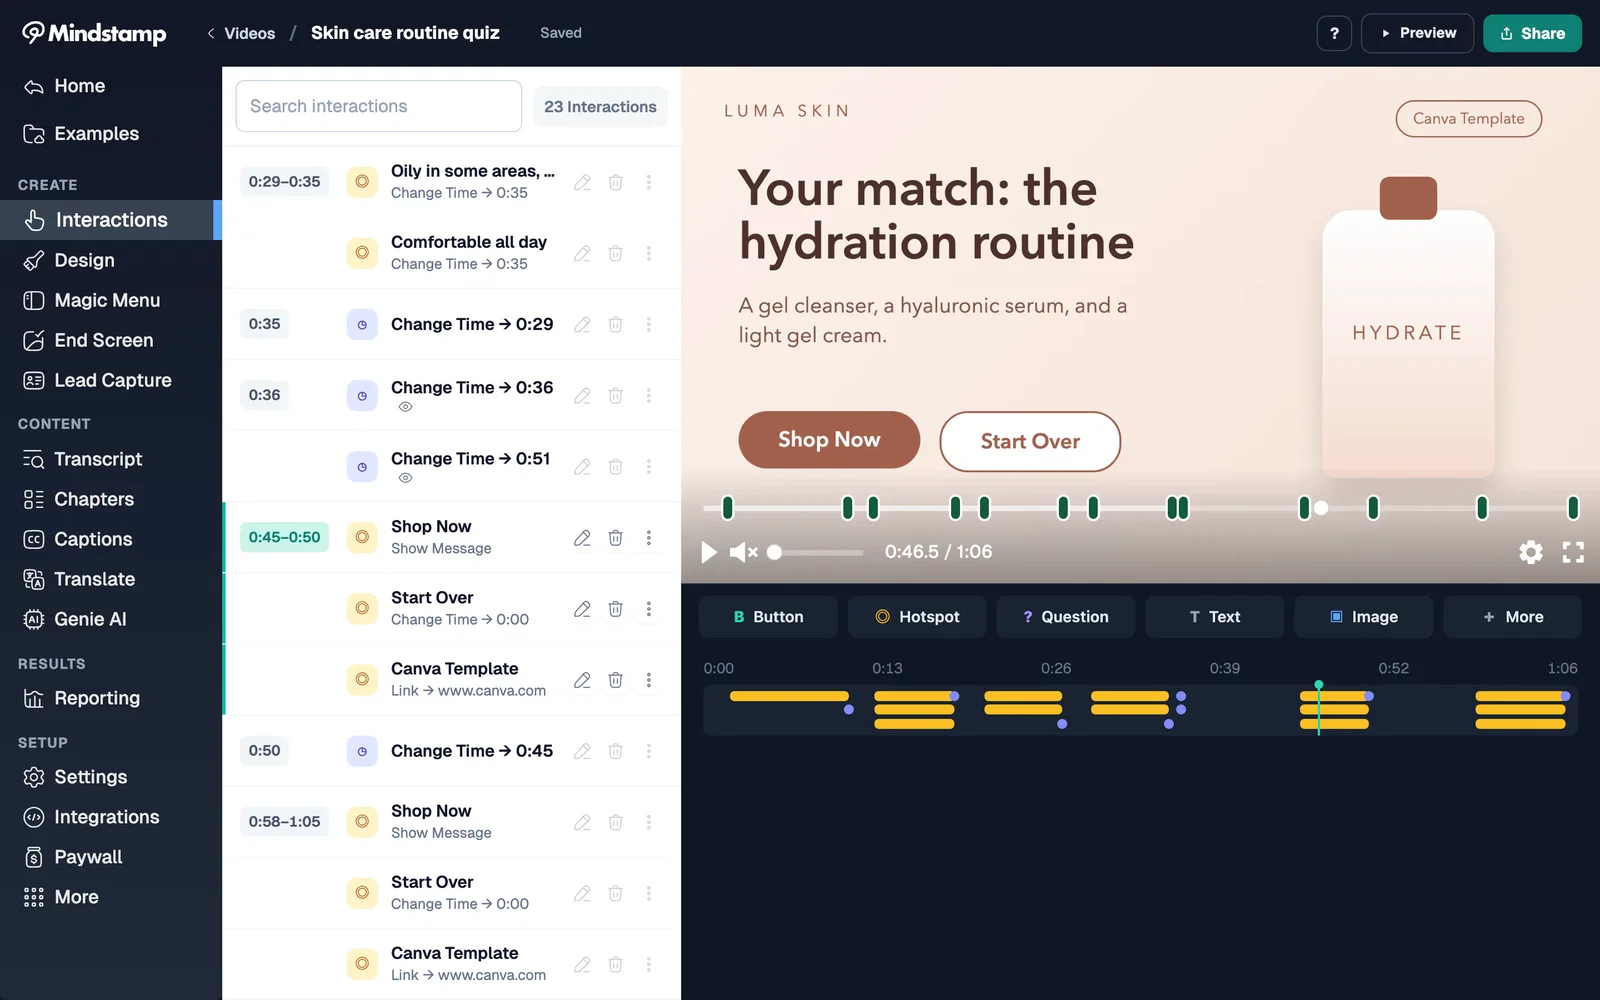
The table maps every interaction in the published skin care quiz, so you can copy its structure. Times are minutes and seconds into the 66-second video.
| Scene | Time | What Mindstamp adds |
|---|---|---|
| Opening | 0:00 to 0:11 | A Start hotspot sets score to 0 and jumps to 0:11.2. A Change Time navigation at 0:11 loops back to 0:02 until the viewer clicks Start. |
| Question 1: "After washing your face, how does your skin feel?" | 0:11 to 0:19 | Two hotspots per answer, one on the label and one on the photo, from 0:12.9. "Tight and uncomfortable" adds 1 to score. Both answers jump to 0:19.1. The hold loops from 0:19 back to 0:13.4. |
| Question 2: "Does your skin often look dull or lack a healthy glow?" | 0:19 to 0:27 | "Yes" adds 1. Both answers jump to 0:27.2. The hold loops from 0:27.1 back to 0:21.2. |
| Question 3: "How does your skin feel by the end of the day?" | 0:27 to 0:35 | "Oily in some areas, dry in others" adds 1. Both answers jump to 0:35.3. The hold loops from 0:35.2 back to 0:29.3. |
| Result router | 0:36.1 | Two Change Time navigations with conditional logic. If score is greater than 2, the video goes to the hydration result at 0:36.2. If score is less than 3, it jumps to the moisture result at 0:51.2. |
| Hydration result | 0:36 to 0:51 | Start Over jumps to 0:00, Shop Now shows a message, and a Canva Template tag opens the Canva design. The hold loops from 0:50.3 back to 0:45.1. |
| Moisture result | 0:51 to 1:06 | The same three hotspots. The hold loops from 1:05.2 back to 0:58.4. |
Add the Start button and the score
Move the playhead to the first frame where the Start button is fully on screen and click Hotspot in the interaction bar. Drag the hotspot over the button and set its Hide time to the end of the opening hold. Under Content, type a Caption that names the button, because screen readers announce it. Set the Click Action to Change Time and enter the time where the first question starts. Then open Variables & Logic, choose a variable named score, and set its value to 0. A reset on the Start button means a viewer who selects Start Over begins again at 0. Your Canva button already looks clickable, so you can turn off the hotspot's indicator ring in its styling (see how to add a clickable hotspot).
Hold each scene until the viewer clicks
Click More in the interaction bar and choose Change Time. Set its Action Time to the end of the scene's hold, and set Time to switch to the moment the buttons are fully on screen. The loop repeats with no limit, so the hotspots inside it are the only way forward. A navigation cannot run before 0:01. Our help article on looping part of a video has the details.
A still scene can pause instead of looping. Set each answer hotspot's Pause to At show time with Pause Length set to Until Interaction. The video stops when the answers appear, and a click on any of them continues it (see requiring a click).
Make each answer jump and keep score
Add one hotspot over each answer for the length of the hold, with the Change Time click action set to the start of the next scene. If you designed the label and the picture as separate pieces, cover both, as our first question does. On every answer that points to the same result, open Variables & Logic, choose score, and select Increment +1 under Value. Mindstamp writes the expression {{ score + 1 }}, which adds 1 each time a viewer clicks that answer. The other answers leave the score as it is. Variables are on Core and higher plans (see how variables work).
Ask for an email before the result
This step is optional. To follow up with shoppers, open the Lead Capture tab, turn it on, and set the timing to At time, a moment before the result router. Ask for a name and an email, mark both Required, and write a prompt such as "Enter your email to see your result." Every later click then appears under that person in your reports. Lead capture is off in our public demo, so you can play it without an email. See lead capture for the options.
Send each viewer to the matching result
After the last question, add two Change Time navigations at the same time. In each navigation's Conditional Logic section, choose Show if and build a rule on score. In our quiz, the first rule is score Is a number greater than 2 and jumps to the hydration result. The second is score Is a number less than 3 and jumps to the moisture result. Greater than and less than leave out the value itself, so a score of 3 matches only the first rule and a score of 2 matches only the second. Conditional logic is on Pro and higher plans (see conditional logic). The 14-day free trial includes variables and conditional logic, so you can build and test the whole quiz first.
Add the result buttons
On each result scene, put a hotspot over Shop Now with the Open Link click action and the product page address. If you sell on Shopify and have connected your store, choose the Add to Cart click action instead. The video pauses and a cart opens inside the player with that product, and the Buy now option sends the viewer straight to checkout (see the Shopify integration). Put a second hotspot over Start Over with Change Time set to 0:00, and loop the result's hold like the question scenes.
Test every path
Test from Preview, or from the share link in a private browser window. The editor shows every interaction at once and does not set variables, so the score cannot route you there. Play each path to the end: all three hydration answers, then a run with at least one moisture answer. Check that every hold repeats until you click, that every button leaves it, and that Start Over gives a fresh score. Then try the quiz on a phone and check that each button is easy to tap.
Use an interactive video quiz in ecommerce
Put the quiz where shoppers choose between products: embed it on a collection page or a landing page, or link to it from an email or a social post. These choices make the results easier to use:
- Add UTM tags to each result's product link, such as utm_campaign=skin-quiz and utm_content=hydration, so your analytics can separate quiz traffic by result.
- Put a variable in a link to carry an answer to your site, for example https://example.com/products?result={{score}}. The Append variables setting in the video's Settings adds every variable to the links the video opens.
- Pass values into the quiz from your site, such as a customer's name or email, by adding them to the video link. The variables reference in our developer docs shows the link format and a snippet for embedded videos.
- With Shopify, carts made in the video carry the attributes Mindstamp Video, Mindstamp Play ID, and Mindstamp Interaction ID, so Shopify shows which video and which click started an order.
To see what shoppers chose, open Reporting. Interactions lists each click and answer, and Viewers shows everything one identified person did across your videos. With lead capture on, each of those rows has a name and an email you can follow up with. For more on clickable products, read our guide to hotspots in ecommerce product videos and see shoppable video.
Common questions
Can I add a quiz to a video I already made in Canva?
Yes. Any MP4 you download from Canva can take Mindstamp questions, which pause the video and show the question in a panel over it, so you do not need answer buttons in the design. To match your Canva style, set the panel's colors and its Panel style (Fill Frame or Floating Card) in Design, under Questions. Mindstamp has 13 question types, and our guide to creating an interactive video quiz walks through them. To keep part of the frame visible behind a question, see see-through questions.
Should I use hotspots or Mindstamp questions for the answers?
Hotspots over your Canva buttons keep the quiz in your own design, and each click appears in the Interactions report. Mindstamp questions pause the video on their own, can mark an answer correct or wrong, and show how all viewers answered in the Questions report. A product quiz has no wrong answers, so hotspots usually fit it better. A product knowledge check for customers or a sales team fits scored questions.
What happens if I change the video in Canva later?
Download the new MP4 and select Replace source video under More. The interactions, settings, share link, and embed code stay the same. The interactions also keep their times, so if a scene moved in Canva, move its hotspots and loops to match. Keeping each scene's timing the same when you edit saves that work (see replacing a video file).
How can a sales team make product demo videos with assessment questions quickly?
Record the demo with a screen recorder, or build it from screenshots in Canva, and upload it to Mindstamp. Add a scored question after each feature the rep must know, and mark the correct answer. If the video has narration, the AI question builder can draft multiple-choice questions from the transcript for you to review. A Canva video with only music and on-screen text has no spoken words for the AI to read, so write those questions yourself. See interactive product demo videos and sales product knowledge training.
Which Mindstamp plan does a product quiz need?
The one-question and branching patterns need only hotspots and Change Time, which every plan includes. Lead capture and the Shopify integration are on every plan too. The score pattern also needs variables, on Core and higher, and conditional logic, on Pro and higher. See pricing for the current plans.
Build your first product quiz
Write down two results and three questions that separate them, then design one Canva scene for each, with a six-second hold after the buttons appear. Download the MP4, upload it to Mindstamp, and copy the structure from the scene table above. Test every path in a private window before you share it. To play another finished quiz first, open the product quiz example.