Personalization is a great way to catch the attention of your audience and establish a stronger relationship. When creating videos, you can add a whole new level of personalization to your viewer’s experience by adding dynamic features. By using dynamic features within your videos, you can tailor your audience's video experience based on data collected from each viewer— 22% of consumers are willing to share data if it means they’ll have a more personalized experience. Conditional logic is one of the easiest ways to create dynamic, personalized experiences by allowing different content to be displayed (or not displayed) based on the input collected in the video.
So how can you create a personalized video with conditional logic, anyway?
With conditional logic, you are setting up a process that changes the viewer’s experience based on actions they’ve taken and the information you’ve gathered from your viewers throughout the video. Based on the viewer's actions and data collected, conditional logic sets variables and then uses "IF/THEN" statements to determine the direction or content displayed next within the video. To break it down, IF someone selects option A,THEN they’ll be displayed the option A variable. IF someone selects option B, THEN they will be displayed option B.
Mindstamp is an interactive video platform that allows you to easily add conditional logic to any existing video so you can create a truly customized and personalized video that drives action. For this action-based personalization strategy to work within Mindstamp, you’ll need to collect data from the viewer during the video so that you can use that data in a later interaction.
Check out this video as we walk through how to set up variables and start using them in your Mindstamp Videos.
Now that you know what conditional logic is, here’s an example of how you can easily implement Mindstamp’s dynamic features within your existing videos to create a truly personalized video experience:
1. Upload or link your existing video to Mindstamp's interactive video platform. Check out this tutorial for more information on how to upload your video to Mindstamp.
2. Next, you’ll want to set up an interaction to collect data from your viewers. You can collect basic personal information through ‘Viewer Info Capture,’ but the easiest way to do this is through Mindstamp’s question feature. Click ‘Add Question’ and decide where you’d like the question to be placed in the video by updating the ‘Question Time’.
Then, determine which type of question to use depending on the information you’d like to collect. For more text-based personalization that allows you to personalize buttons and comments, free-response works best. For action-based personalization where someone can determine the direction of the video, multiple-choice is most effective. For this example, we’ll use multiple-choice.
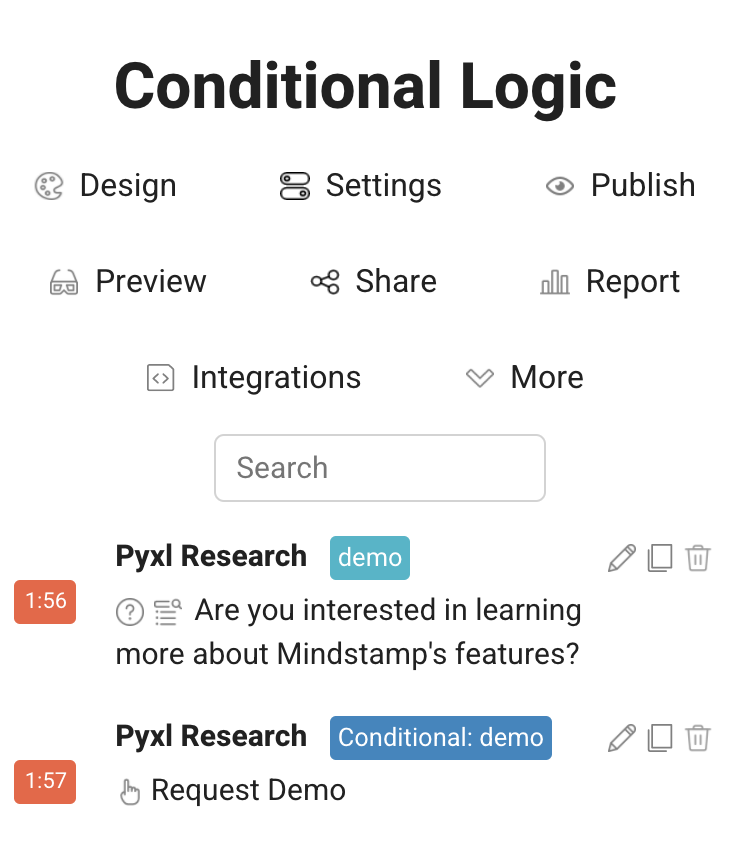
3. Type in the question that you’d like to ask the viewer under ‘Question Prompt’. In this case, we’ll use “Are you interested in learning more about Mindstamp’s features?”
4. Next, under ‘Answers’ you’ll want to type in the different answer choices that the viewer can choose, along with what action will take place when they select each answer. For this example, we’ll provide one answer that indicates the viewer is interested and one where they aren’t.
5. Under ‘Store Variable’, provide a label for your {{variable}}. The variable is a placeholder that will be used to display each viewer’s answer to the question. Because the variable is just a placeholder for Mindstamp to identify where to place the viewer’s response to the prompt, the text chosen for the variable can be anything you want. We’ll use {{demo}} as our variable to be used later.
After saving the interaction that collects the information, you can create another interaction that uses the {{variable}} you created to personalize the video based on their response. In this example, we will add a button following the question that guides viewers who answered incorrectly to visit a math help site.
6. Navigate to the point in the video that you’d like to add your next interaction and click ‘Add Button’.
7. Check ‘Use Conditional Logic’ to set up your IF/THEN statement. For this example, we’ll do “Show if {{demo}} equals Yes”— This makes it so the button is only shown if the viewer responded to the question saying that they were interested in learning more.
8. Under ‘Text Content’, write what you’d like the comment to say using the variable that you created in the first section. In this example, we’ll type in “Request Demo” and set the ‘Click Action’ to open a link to sign up for a demo.
9. When reviewing your interactions on the right sidebar, make sure that the interaction you created is tagged as ‘Conditional: {{variable}} to ensure that you’ve successfully set up the logic.

To see conditional logic in action, check out this video:
By personalizing your video content, you create an engaging experience that will ultimately help your company reach its goals. With the countless benefits of personalization and the ease of using conditional logic, now’s the time to begin implementing dynamic features into your video marketing strategy to create a personalized video experience for each viewer.
To learn more about adding interactive elements to your website using Mindstamp, schedule a free demo or visit our website to learn more!